Configuring TCP/IP and SLIP with Cisco-Router and V3R2
This article describes how to configure OS/400 V3R2 (and possibly newer) wired to a Cisco-Router to get TCP/IP connectivity to the local LAN via SLIP "dialin".
SLIP was a lightweight, but crude protocol. Connection parameters had to be established prior to the communication protocol itself. It was superseded by PPP. OS/400 V3R2 had no PPP support implemented.
Note: The outcome of the configuration being described yields a functioning connection for ICMP and UDP packets. TCP connections seem to hang. See below for details. Thus the described procedure does not produce a fully usable TCP/IP connection.
Requirements
- AS/400, complete and functioning
- TCP/IP installed
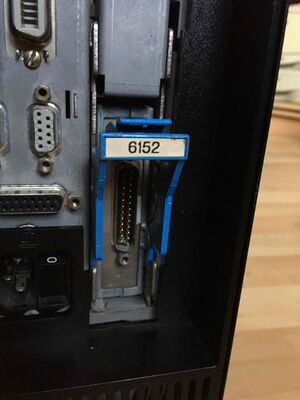
- Local serial port with required breakouts, such as a #2609, or a #2652
- IBM V.24 Modem Cable[1]
Note! AS/400 serial ports have sense pins, to know which kind of cable is attached. Therefore the requirement of an IBM V.24 Modem Cable, or a self made cable providing the necessary sense pin connectivity.
- Cisco Router with either
- an AUX port,
- multiple async lines (like on a 2511),
- a T-Type serial port (built-in or on an add-on card) with platform support to switch that port to async mode.[2]
Depending on the port used on the Cisco Router, you need a matching cable:
- Cisco CAB-232 FC for a T-Type port,
- Cisco Rollover Cable — this is a flat 8-wire cable with RJ-45 connectors on each side, but it connects Pin 1 to Pin 8, Pin 2 to Pin 7, and so on.
Note: A simple network patch cable will not work.
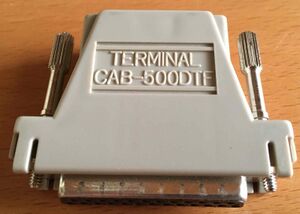
- Cisco CAB-500DTF adapter for use with Octopus-Style serial breakout cables for 2511 and similar routers, as well as Cisco Rollover Cables.
In addition, you need to choose an otherwise unused IP address from the LAN the Cisco Router is attached to. We're using 192.168.0.50, while the Ethernet Interface of the Cisco Router has the address 192.168.0.10 255.255.255.0.[3]
The example configuration presented here uses the AUX Port of a Cisco 2513.
Basic Configuration on AS/400
After plugging everything together like pointed out above, the machine is to be configured. Type WRKHDWRSC *CMN to get a list of communication hardware, and associated ports. Example:
Resource        Type  Text
CMB01           917B  Combined function IOP
  LIN01         2609  Comm Adapter
    LIN011      2609  V.24 Port
    LIN012      2609  V.24 Port
Note! OS/400 V3 seems to not designate ports as CMN, but as LIN with three digits. Newer releases designate ports on an adapter as CMN.
I've connected the AUX-Port of the Cisco to LIN012.
Note that you need the appropriate authority for doing system administration tasks.
We now need to create a Line Description for this port:
CRTLINASC LIND(ASYNCLIN) RSRCNAME(LIN012) LINESPEED(19200) TEXT('Serial Line for SLIP') CMNRCYLMT(10 1)
Note that with the tested AS/400 P03, OS/400 V3R2 in combination with a 2609 dual serial port adapter, the maximum serial speed is 19200 bps.
TCP/IP Configuration on AS/400
First, choose a TCP/IP hostname for your machine. The default SNA name comprised of the letter S followed by the system serial number is sufficient.
GO CFGTCP- Optional: Take option
20. Configure TCP/IP applications- take all sub-options, and decide on Autostart Server to be *YES or *NO. Less servers to start lessens time to start TCP/IP at large. Most often you may want just FTP, and telnet servers to be started automatically.
- Press
F12.
- Take option
12. Change local domain and host names- Put in the desired values. If you don't have a DNS domain name, you may use local as Local domain name.
- Press
F12.
- Take option
10. Work with TCP/IP host table entries[4]- Enter 1 as Opt into the first (empty) line, our IP address 192.168.0.50 into the field Internet Address and press
Enter. - Fill in the host and domain name separated by a dot, for example s4412345.local, and press
Enterto save the changes. - Press
F12.
- Enter 1 as Opt into the first (empty) line, our IP address 192.168.0.50 into the field Internet Address and press
- Take option
22. Configure point-to-point TCP/IP, and sub-option1. Work with point-to-point TCP/IP.- Enter 1 as Opt into the first (empty) line, type an arbitrary name (such as SLIP0) into the Name field, and *DIAL into the Mode field. Press
Enterto advance to the details screen. - Type our IP address 192.168.0.50 into the Local interface address field
- Type the IP address of the Cisco Router 192.168.0.10 into the Remote interface address field
- Change Add default route to Y
- Page down to the next bunch of parameters
- Fill in the name of the line description created above into the field Line description
- Leave all other options at default values, and press
Entertwice to save the changes. - Press
F12.
- Enter 1 as Opt into the first (empty) line, type an arbitrary name (such as SLIP0) into the Name field, and *DIAL into the Mode field. Press
- Type STRTCP, and press
Enterto start the TCP/IP stack and servers.
Depending on the machine, this takes some time to complete. Note: A connection attempt will not be made automatically!
Configuration on the Cisco Router
Assumption is that the Router has already a basic configuration applied. This includes the Ethernet Interface.
I disabled each and all authentication for that line. It would have complicated matters on the OS/400 side to choose/develop a working "chat script" for login and start of the SLIP protocol from an interactive command line. In a hobbyist environment, the risk imposed by this deliberate decision is negligible. Your mileage may vary.
aaa new-model
aaa authentication login serial-lines none
aaa authorization exec serial-lines none
aaa authorization network default local
!
interface Ethernet0
 ip address 192.168.0.10 255.255.255.0
 load-interval 60
 arp timeout 300
!
interface Async1
 mtu 576
 ip unnumbered Ethernet0
 encapsulation slip
 load-interval 60
 async default routing
 async mode dedicated
 peer default ip address 192.168.0.50
!
ip route 192.168.0.50 255.255.255.255 Async1
!
line aux 0
 exec-timeout 0 0
 authorization exec serial-lines
 login authentication serial-lines
 autocommand slip
 stopbits 1
 speed 19200
!
Remarks:
- Be cautious with the AAA-Lines! If you don't have a local user defined, and no enable secret set, you might lock out yourself. Test access with a new telnet connection before closing the existing one!
- The interfaces' name Async1 is hard wired to line aux 0.
- The local route enables proxy ARP to be used on Ethernet 0 for the remote address 192.168.0.50 of the SLIP connection.
- Make sure you actually set stopbits 1. IOS default is 2.
Starting the connection
The SLIP connection is started by means of a batch job being submitted, and running in the background. Unfortunately, the batch job isn't allowed to start the connection by default. You need to change the authority of the connection program once:
GRTOBJAUT OBJ(QSYS/QTOCPPSM) OBJTYPE(*PGM) USER(QTCP) AUT(*USE)
You can start the connection by either
- Take option
1. Work with point-to-point TCP/IP, and type Opt=9 into the line with our created connection profile, or - from any command line, type
STRTCPPTP CFGPRF(SLIP0) OUTPUT(*NONE) AUTODLTCFG(*NO).
SLIP0 is the connection name created above.
Frequent presses of F5 should show that the Status transitions through different stages until ACTIVE.
Unresolved issues
- ICMP, and UDP (example: SNMP) packets go through quite well. TCP connections hang. Tcpdump shows that there is no answer from the AS/400 for some time. Example FTP connection attempt from a Linux machine at 192.168.0.11 to the AS/400 at 192.168.0.50:
16:11:07.578167 IP 192.168.0.11.50676 > 192.168.0.50.21: Flags [S], seq 3132164903, win 65535, options [mss 1460,sackOK,TS val 3162178493 ecr 0,nop,wscale 2], length 0
16:11:07.674309 IP 192.168.0.50.21 > 192.168.0.11.50676: Flags [S.], seq 1604102855, ack 3132164904, win 8192, options [mss 536], length 0
16:11:07.674388 IP 192.168.0.11.50676 > 192.168.0.50.21: Flags [.], ack 1, win 65535, length 0
When the FTP client complains with a timeout error, this is shown.
16:12:07.674809 IP 192.168.0.11.50676 > 192.168.0.50.21: Flags [F.], seq 1, ack 1, win 65535, length 0
16:12:07.982822 IP 192.168.0.11.50676 > 192.168.0.50.21: Flags [F.], seq 1, ack 1, win 65535, length 0
16:12:08.055579 IP 192.168.0.50.21 > 192.168.0.11.50676: Flags [FP.], seq 91, ack 2, win 8192, length 0
16:12:08.055663 IP 192.168.0.11.50676 > 192.168.0.50.21: Flags [R], seq 3132164905, win 0, length 0
Recent tests were from older Macs with MacTCP but with the same result: The connection hangs. No further packet dumps have been made.
I'm not sure what can be done about that.
See also
- Serial Cables IDs
- RS-232 Modem Cable Pinout
- Integrating LAN-less Machines into a local Token Ring
- Post-Install Optimizations, IPL-Customization, e. g. for automatic start of TCP/IP at IPL time.
Weblinks
- Serial Cable CAB-232FC, Cisco.com
- AS/400 Service Functions, SY44-5902-03[5]
- OS/400 TCP/IP Configuration and Reference V4R4, SC41-5420-03[6]
Footnotes
- ↑ If the machine was attached to a modem in earlier times, and you obtained all the cables, all requirements are satisfied.
- ↑ in interface configuration mode, try to set
physical-layer async. If this fails, that particular combination can't handle async over T-Type serial ports. - ↑ We're using Proxy ARP for delivery of the packets over SLIP to the AS/400. Cisco IOS enables this by default.
- ↑ Failing to adhere to this brings up failed to find by hostname errors in the job logs of the internet servers being started.
- ↑ PDF page 245, Table 51, bottom line on that page displays the cable-id connected pins. See also the notes on the top of the next page.
- ↑ PDF page 138ff describes how to write connection scripts, if SLIP authentication is desired.

